For this tut you will need working knowledge of psp
iv made this tut with my own crazy mind any similarities are purely creative minds thinking alike.
What you will need to fallow this tut
-tube of choice (close up and full) im using the amazing artwork by Keth Garvey yo use his tubes you must purchase a license and his tubes from MPT -Scrap kit Spring Punch by the lovely Artmama you can snag her freebie HERE -The sweet masks i provided are included in the supplies (not sure where they came from but the file names are intact. so if these are yours please please let me know so i can credit you) MY SUPPLIES -masks, frame and pattern
Filter used -Xero- porcelin and radience
On to the tut We are going to work from the bottom layer up Open all your supplies into psp
-open a new canvas 550x550 you can resize later if needed
-open paper 05 and resize 550x550 copy and paste on your canvas layers-load kylie mask 05 merge layer group
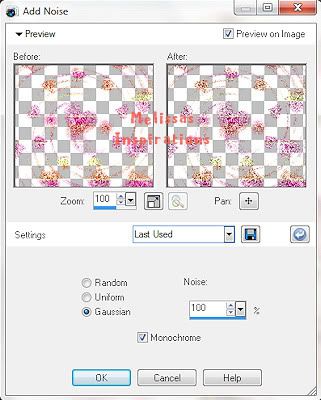
-open paper 09 , resize 550x550 copy and paste as a new layer on your canvas layers-load second mask merge layer group Adjust-add noise with these settings
-Open embellie 11 and resize to 400 copy and paste to your canvas duplicate layer flip and mirror merge together (i added more noise to it)
-open embellie 08 resize to 525x525 duplicate layer-flip and mirror-then merge togther copy and paste to your canvas
-Open embellie 13 resize with to 525 copy and paste to your canvas (i just kept mine right in the middle)
-Now open the frame i provided copy and paste on your canvas position to the top right corner duplicate-mirror-flip-merge together -Using your magic wand click inside each frame selections-modify-expand by 6 Copy and paste your paper 09 Invert-delete your extra paper -now select all-float-defloat add a new raster layer and floodfill with the pattern i provided and set the blend mode to hard light
-I colorized the frame to a yellow color and gave it the noise setting i used before
-Add your close up tube and position inside one frame duplicate and mirror and position in the other frame -Again click inside your frames with the majic wand selections-modify-expand by 6 invert and delete the extra tube Change the blend mode to Luminance L and lower the opacity to 90% Effects-xero-radience with these settings
-Now add your tube reside if needed to fit Effects-xero-porcelain with these settings
effects-radience with these settings
_Open embellie 23 (flower) resize with to 70 copy and paste onto your canvas and duplicate and position around your canvas merge them all together
Now add copy rights and names and were done
Hope this tut has been useful be sure to come back and show me what you came up with [/size]