

4 WAY WITH L N K
This tutorial was written on the 24th of June 2010 any other tutorial similar to this is purely coincidental, I as the owner of this tut have the right to move or copy it specifically into my tutorial site. This was also written for advanced users as something’s may not make sense to beginners
Tools needed
L N K filters you can google these and find them
Penta jeans
Xenofex constellation (optional)
Tubes of choice on the 1
st image I am using the gorgeous work of Jose Cano u can find His artwork
HERE please do not use these tubes without the proper license to do so
Elements of choice
Ok forewarning you now, the animation takes a bit of time, and please do not deselect in this tutorial until you are told to do so unless you want a different effect.
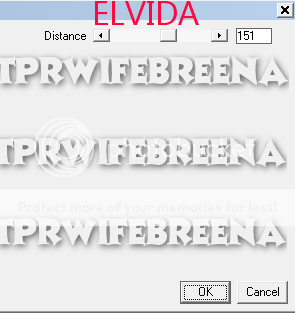
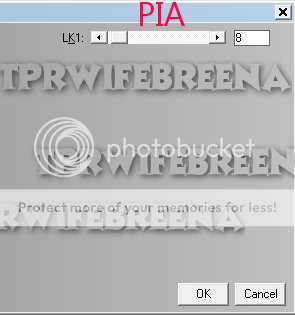
Open a canvas of 200 height and 500 widths flood fill with a gradient of choice, something to match you tube. Duplicate this layer so u have 4 layers altogether, selections select all and contract by 5. On the fist layer (this should be on the bottom) apply LNK elvida, 2
nd pia blend mode screen opacity 89, 3rd Andreas blend soft light opacity 79, and 4th Antonio blend light multiply. Use the following settings below

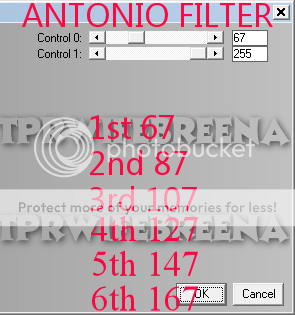
On the Antonio layer duplicate it till u has 6 altogether and change the numbers on top use my numbers on there for the remaining 5 layers. You can now deselect once you have finished. PLEASE MIRROR EVERY OTHER LAYER OF THIS EFFECT THE 1st LAYER WILL BE AS IS THE SECOND, 4TH, AND SIXTH IS MIRRORED.
Okie dokie now place your tubes to liking change the blend modes to screen n lower your opacity to what looks best, I chose 80Now that we have the majority of the set done we’re going to add a bit of a banner right across it, use your rectangle tool n choose a nice color to go with your tube. Now add your penta jeans with 62, and 4. Once you have done so go to your texture effects, weave with the numbers 2, 5, and 30 both squares white. Add a slight drop shadow and lower the opacity to 60.
Add your wording elements c/r and name all at this point.
Animation Steps
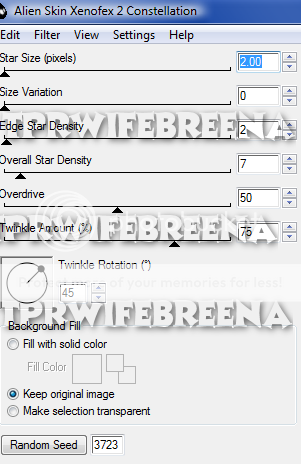
Add a new layer select all and contract by 5 again invert and flood fill with your gradient. Deselect and duplicate till you have 3 of these. You can either add the constellation on to the layers or you can go ahead and use noise on yours but here is the constellation I used.
Close off your top tube, and the 3 borders. Copy merged your Tag and paste as a new image in A/S with the 1
st Antonio setting, close that off and use the second; keep doing so until you have 6. Click on your 1st tag layer and copy and paste it in the end of your images this gives you a total of 7.
On the 1
st image go to effects image effect and add fade with the numbers 1.0 n 3, do the same to the numbers 5, 9, 13, 17, and 21. Delete frame 25
Now here is the tiresome part, you have to select each frame and duplicate them so u have a total of 48 frames. Once finished change the properties to 10.
Now close off the layers open the 1
st border n your tube copy merge into a/s do the same thing with the following 2 borders and duplicate them so you have 48, what I do is select all and copy and paste them after the last frame. Once finished select all borders copy and go back to your image and select all and paste into frame. You can go ahead and save your tag now


