
This tutorial was written on the 1st of November 2009. Any similarity to any other tutorial is purely coincidental
TOOLS NEEDED
My Template
HereTubes of choice I am using the art work of Ismael Rac you can find his tubes
HereFonts of choice
Scrap kit it’s the law maam by QueenBrat Designs you can find her work
HerePlugins needed penta dot and cross (optional) xenofex 2 lightening
Animation Shop
Open up the template I provided and hit shift and D to duplicate close out the original. You can recolor the background to your liking a bit later or you can do so now to match your tubes of choice.
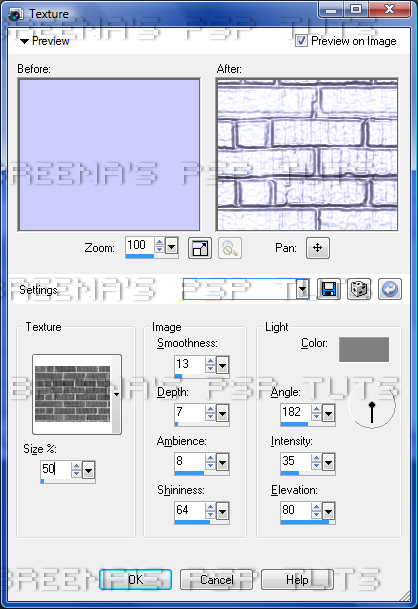
Select raster 1, selections select all float/defloat and flood fill with a color of choice or you can make them 2 separate colors totally up to you. You can either add the texture I have below or you can choose to use other textures to your liking; remember this is your tag I am only here to help.
While this is still selected open your tube/s of choice and add them as a new layer like mine. Go to selections invert delete, and this will delete your excess tubes.
On your background layer (you may recolor it now if you didn’t do so already) add the following penta dot and cross settings 80, 35, 10. Go on ahead to raster 3 and recolor the window/box keep selected and add the following inner bevel to it.

Add your elements from the kit to your tag at this time. Add your sayings of choice if you’re not going to use mine and your name and copy right info.
Now maximize your tag to about 300 and duplicate your non behind bars tube 2xs so you have a total of 3. On the top layer add xenofex lightening with the following:

Do this for the 2nd layer as the third layer will be our stand alone layer but hit random seed once. The third layer should be left alone now.
TO ANIMATE
1.Open raster 2 of the jail cell bars and all other layers except for the 2 lightening tube layers copy merged and paste as a new animation in AS.
2.Close tube 1 and open lightening 1 of your tag while having raster 2 open still, copy merged and paste after the 1st frame. Do the same for the following for the 2nd lightening tube.
3.Reopen the original tube layer and close out raster 2, open copy 1, copy merged and paste after the 3rd frame. Do the same with copies 3, and 5. (Copy 4 was a mistake found that out after uploading the template).
4.You should have about 7 or 8 frames if you are doing this correctly. Make frame 1 the frame you are working with and change the animation frame properties to 200. Frames 2 &3 to 20. 4, 5, 6 (7) to 25-30, and frame 7(

to 200 also. If you want yours to close like mine I took frames 4,5,6 and copied and pasted it after my last frame.
You can now save and enjoy your tag


