This tut was created on the 9th of January 2010, by me and similarities are purely Creative minds thinking alike.
Supplies used PSP x2 and Ani Shop -2 tubes one close up and one with 3 complimenting areas i used my fav. artist, Keith Garvey you can find his artwork HERE -accents and glitter of choice
Filters used -eye candy gradient glow -Fun House-radial Zig Zag
Open new Image 550x250 pick 2 colors that compliment your tubes flood fill with these gradient settings
funhouse-radial zig zag with these settings
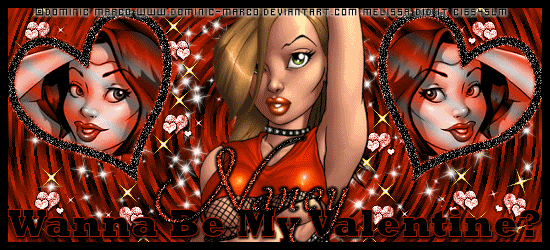
Add the tube you would like for the close up and center it in the middle
Now with your square tool draw out a frame (refer to my tag for placement) with these settings
now with your majic wand click inside the square then add new raster layer then selections-modify-expand x3- flood fill with color (i used the same gradient just swapped colors) Now duplicate and Mirror. Now go to Adjust-add noise with these settings
Now add your full tube, center the first part, in my case the head, then duplicate the tube center the chest area, then duplicate and center the hiney area. now using your majic wand click inside your square again, go to selections - invert- highlight the first tube then delete- highlight second tube- delete - same for 3rd tube
select none
click on your first tube - duplicate - mirror click second tube - duplicate - mirror same for third tube
Change all framed tube layers to luminance (L)
now move your frame layer to the top of the tubes
Add some glitters and elements to compliment your tubes
Add a name and proper copyrights and well be on to Animation
Animation
Make sure both framed tubes go from head to hiney closing off the 3rd and 4th
psp - Copy merged ani - Paste as new animation psp - Close off first (in both) un hide 2nd - Copy Merged ani - Paste after current frame psp - Close off the second tubes and open the 3rd ones ani - Paste after current frame psp - Close off 3rd and open 1st ones again - Copy Merged ani - Paste after current frame
Now you should have 4 frames in Ani shop - highlight the first frame - Effects-Insert Image Transition with these settings
Highlight frame 37 -Effects-Insert Image Transmition same setting as above
Highlight frame 73 - Effects - Insert Image Transmition same settings as above
Highlight the last frame and delete it
View - Animation
wooaala
save as a gif and your done
THANK YOU FOR TRYING OUT MY TUT I HOPE YOU ENJOYED IT
DONT FORGET TO COME BACK HERE AND POST YOUR RESULTS